Underfloor Heating Patterns

The Three Main Types of Underfloor Heating Patterns

Did you know that how you lay your underfloor heating system can massively change how the system will feel once it’s all commissioned?
There are three main types of UFH laying patterns: bifilar, meander and double meander.
This week’s #TechTuesday sets out some easy-to-follow references for these three types, including when and where you should use them.

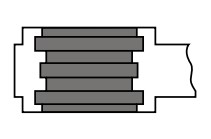
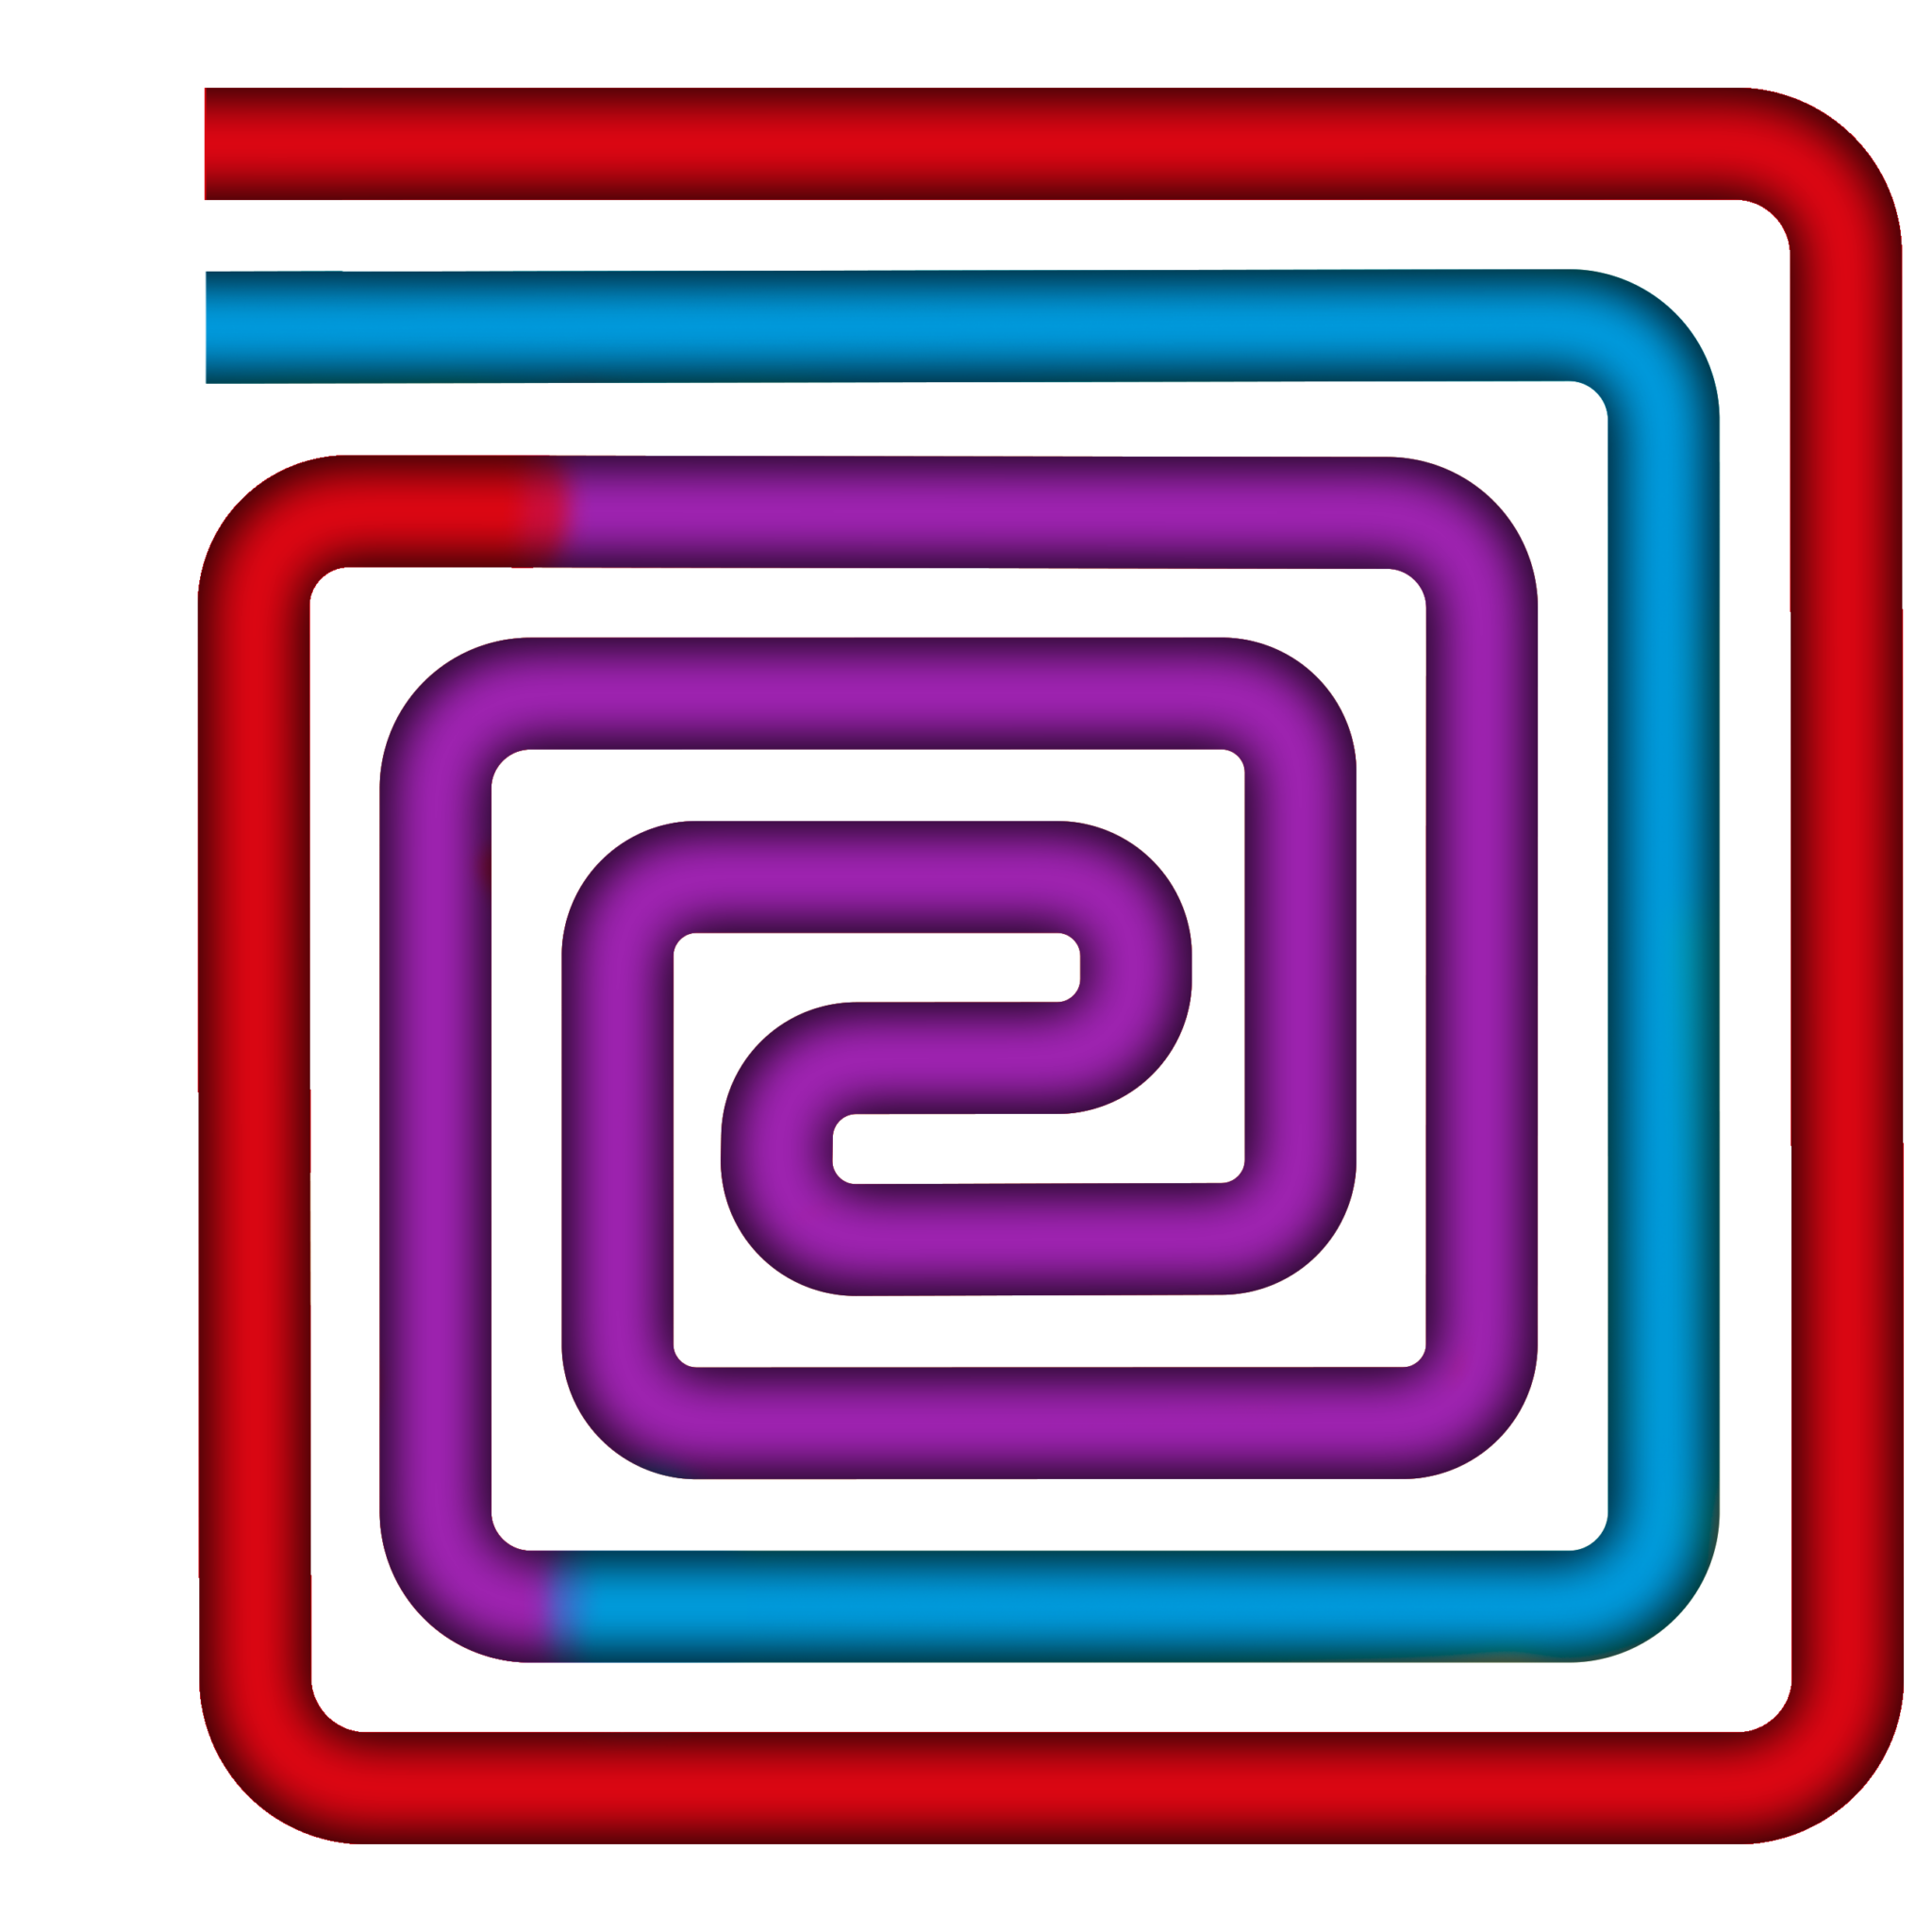
Underfloor Heating Pattern 1 – The Bifilar Pattern

This key pattern is probably the least understood pattern but offers some great benefits and is the Multipipe preferred option.  You will have to give greater thought as to how you’re going to install the pipe before you lay it, however, once you get your head around how to lay this system, you’ll find it is a useful pattern.  Even with very close centres, it’s much easier to lay as turns are only done as half turns and not full turns.

The bifilar pattern has the added benefit of spreading the heat evenly over the floor as it mixes the hot flow pipe with the cooler return pipe.

Bifilar UFH Pattern

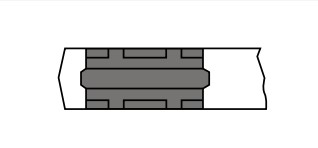
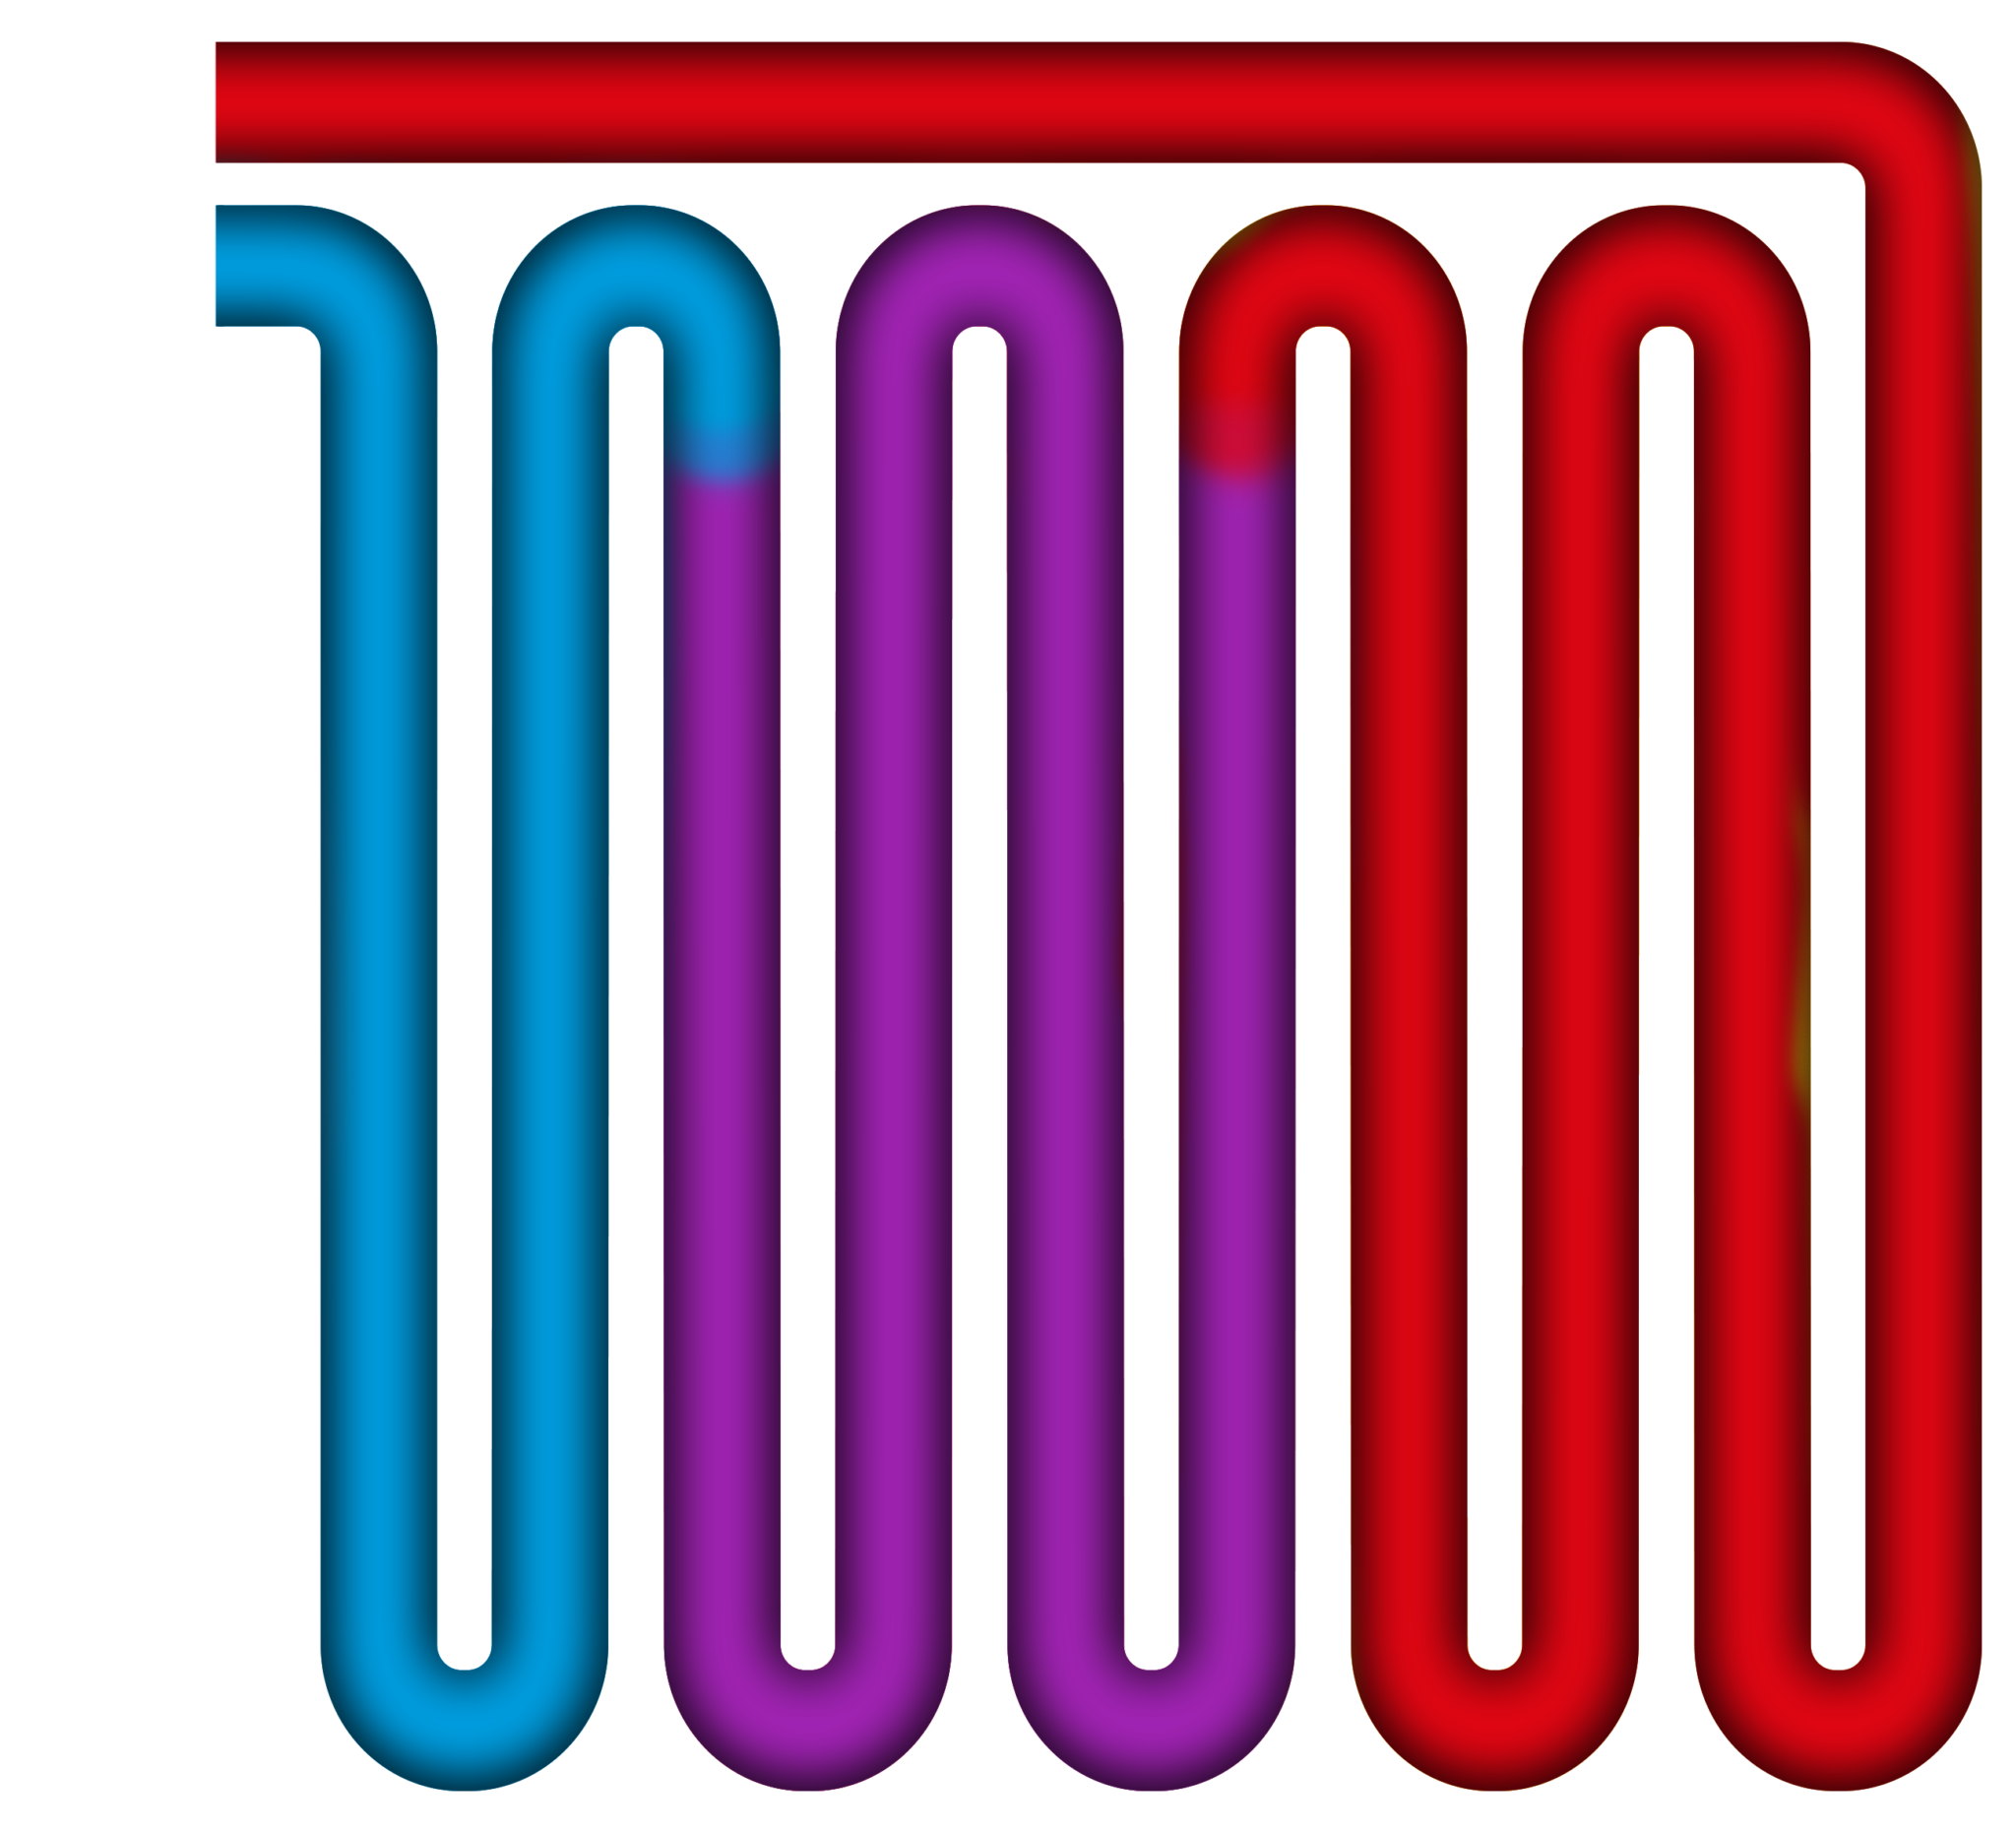
Underfloor Heating Pattern 2 – The Meander Pattern

This is probably the most common pattern in the underfloor heating market as it’s the easiest to understand and design. This type of pattern works by going up and down the room.

You would typically use your warmest pipe (Flow pipe) to cover the highest heat loss (usually a large glazed window). You will also find these patterns prevalent in most overlay boards, and timber suspended systems because this is the only way in which you can lay the pipe. However, on screeded systems, always insist that your chosen manufacturer implements the bifilar patterns where possible.

Meander UFH Pattern

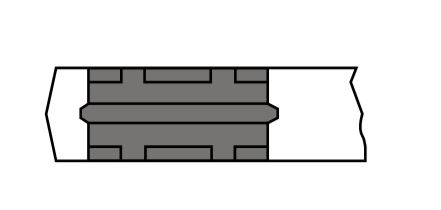
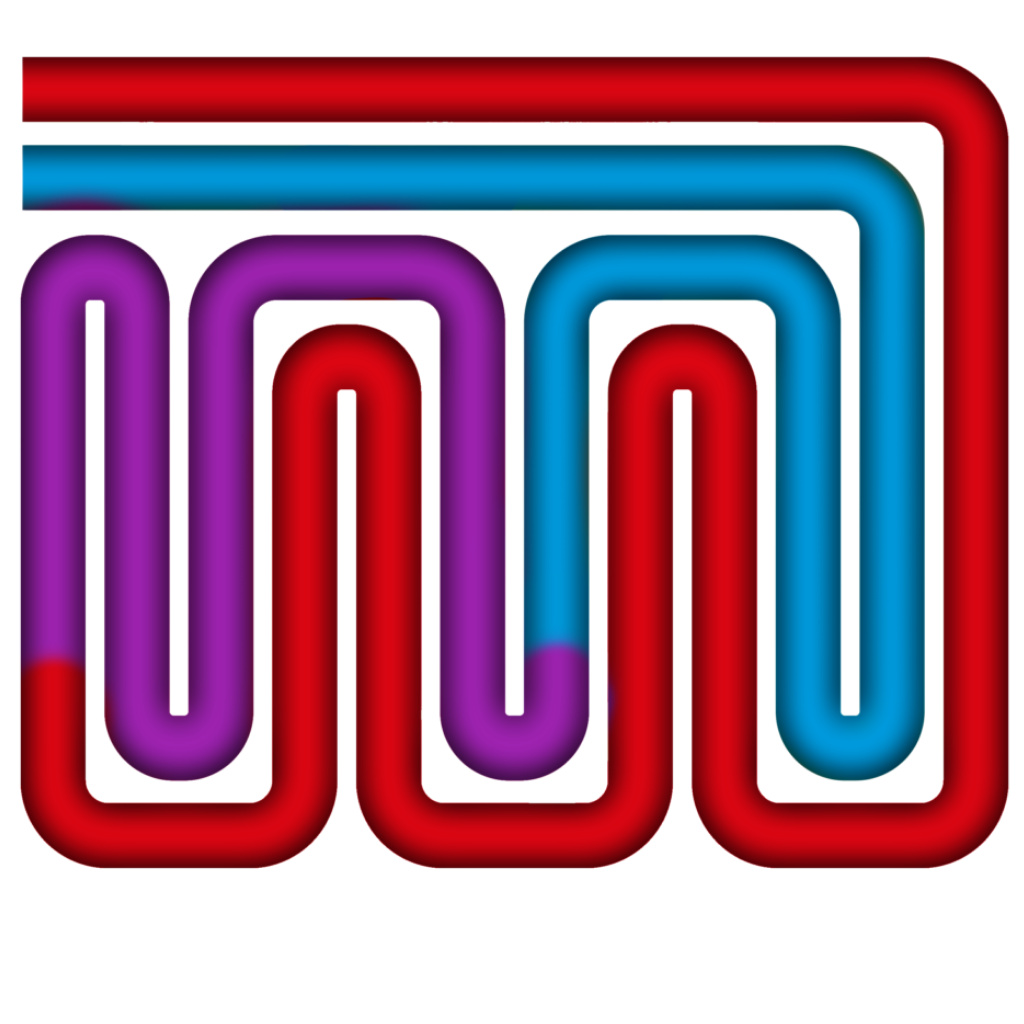
Underfloor Heating Pattern 3 – The Double Meander Pattern

We’re including the Double Meander Pattern just in case you come across the term and wonder what it’s about! This is a hybrid between the two patterns mentioned above and is ideal for timber suspended systems where you cannot do bifilar (and so need to use the Meander Pattern) but want the spread of heat like the Bifilar. However, this pattern is quite complicated to lay and requires a lot more physical labour than the options above without providing any additional benefits, so we recommend avoiding it if you can.

Double Meander UFH Pattern

Remember, that we have a fully qualified design team, and a technical line should you wish to discuss this further and make sure that on your next project you get the most out of your install. We also have plenty of helpful videos on our YouTube channel if you want to learn more.

Email Us


Call Us

Could smart TRV’s save you money this winter?

Smart TRV’s

My house is 100 years old and like 80% of UK houses it has radiators heated by an oil-fired boiler. Until 2 years ago we weren’t able to control the heating properly and it was getting expensive.
To get this sorted I installed manual thermostatic radiator valves, but it was difficult getting the heating balance right for each room. That’s especially tricky when you’re heating a 2-storey home. Setting and adjusting each TRV manually was a bit of a pain.
Then along came Smart Control Motorised TRV’s. They give you independent room control just like modern underfloor heating systems. In fact if you have UFH to the ground floor, why not upgrade the first floor using smart TRV’s?.
The wireless TRV’s run off a gateway connected to your home’s router. You can program the settings for each radiator using an App on your smartphone and the wireless room thermostat and gateway monitors and adjusts the TRV’s accordingly.
Problem solved! I have complete control now, heat is properly apportioned throughout the home and this system saves me around 2000 litres of heating oil every year, so payback was genuinely quick.

If you’ve any more questions about Smart Control Motorised TRV’s, our technical team are always here to help you out. Get in touch with us

Email Us


Call Us

Read more of our Tech Tuesday articles


View all

Follow us on social media to stay up to date with the latest industry trends, product offerings and more Tech Tuesday articles!


Facebook


Twitter


Linkedin


Instagram

Installation Issues With Metal Press Systems


Installation Issues With a Metal Press System

Over the last month, we have been receiving more calls from consultants taking metal press systems out of their specs due to full bore detachments on site. Here are the facts on this issue and how you can look at preventing this on your site.
Like with most systems, you can always install things wrong and with the metal press systems (due to the way the fitting must be made). The failure is generally due to incorrect pipe insertion depths on fittings.
Often installers are not marking the pipe up and, when working up high, do not get the right depth to pass the O-ring but, more importantly, where the crimp is made. So always make sure you follow the insertion depth given by the individual manufacturer, then use a permanent marker to ensure you cannot rub the mark off when getting it into place.
If the fitting moves during the press, then cut out the fitting and start again. Another alternative is to look at the MLC pipework system. It uses a similar pressing system (often, the guns you already have will work), but no marking up of the pipe is required because of how the fitting is constructed. This is thanks to having a joint window on the fitting sleeve.

Multipipe MLC Pipework

Find out more about our Multilayer Composite Pipe and Fittings (MLCP) and get total flexibility for your projects.
If you’ve any more questions about our MLC pipe and fittings, our technical team is always here to help you. Get in touch with us

Email Us


Call Us

Read more of our Tech Tuesday articles


View all

Follow us on social media to stay up to date with the latest industry trends, product offerings and more Tech Tuesday articles!


Facebook


Twitter


Linkedin


Instagram

How You Should Run Your UFH System

How Do You Advise on Running a New Underfloor Heating System to a Customer?

Over the years, Multipipe have had various calls from homeowners about issues with running a Underfloor Heating (UFH) system. And we’ve concluded that education of underfloor heating systems, is the biggest downfall in running an efficient UFH system.

Many end-users that have never previously owned an UFH system will run it like a radiator, whereby they have the heating on in the morning, off during the day and on again in the evening.
For a highly reactive system, this is fine. However, when you have a traditional screed underfloor heating system, this is known as a slow reaction system. So, why not look at how to run it differently?

The best way is to run your heating system continuously through the winter months, using the thermostats in the room to maintain the temperature. This might sound illogical and seem like you would use more energy, but this will actually use less energy than switching the system on and off!

This is down to how your boiler or heat pump works, (providing you have a modern modulating boiler). When you request heat, your heat source will start up and try and start heating all the system water and screed slab from cold.

On a radiator system, this will heat up quickly as there is no slab (thermal mass).  It then relies on heating the air in the room, so this uses energy from the boiler in short bursts, but you never heat the fabric only the air. You will find the boiler will fire for 10 minutes or so, then shut down, then go again around 10 minutes later as the heat is dissipated into the room.

UFH systems work completely differently

However, an UFH system works completely differently. It must heat the screed floor first (this is a heat absorbent material) so it keeps taking the energy from the water, and it will do this for 1-2 hours.

Then the magic happens… now you have a heated floor and surrounding building fabric.  This gently radiates heat to the room; the boiler slows down/stops heating but gently adds in heat occasionally to “top-up” the screed temperature.

But if you let the system cool and re-heat, this will use far more energy as it never reaches this thermal “sweet spot. This is, even more, a case if you have a Heat Pump.

Heat Pumps and UFH

A heat pump works best when it has a gentle heat slope and somewhere to “store the energy”. Heating the screed from cold takes a tremendous amount of energy, and during deep winter, you can even reach a point where the Heat Pump will freeze (ASHP).

The unit will then pause and reverse to defrost itself and this will then steal heat from your lovely warming floor to defrost itself, undoing the work of heating the screed! Whereas if you run this continuously, it will charge up and use the screed floor like a battery and only need topping up when the temperature falls.

To run your boiler/ Heat Pump continuously and just use the air temperature thermostat (I know this does go against building regs) you will be looking at saving 8-10% of energy. Why do I know this? I converted my gas radiator system to a whole home UFH, and as well as an extension, I still saved energy by running continuously.

If you’ve any more questions about how to run your UFH system, our technical team are always here to help you out. Get in touch with us

Floor Covering For UFH

Floor Coverings For Underfloor Heating

The biggest reason for underfloor heating underperforming is usually due to the floor covering. This is normally out of the control of the installer, as it is your client that typically picks the final floor covering. But going forward, we should be educating our customers of the pitfalls of fitting an incorrect floor covering.

After you have completed your final commission and set up the system to work as it should do, your responsibility as an installer is over. But there is nothing stopping your hard work from being undone by a simple incorrect floor covering.

Thick wood and carpets are a killer of UFH outputs, so it is important for the customer to get the “R-value” of the floor covering from the manufacturer and find out whether it is suitable for UFH (as some floor coverings are not!).

You want to be aiming for a floor covering around 0.05 m²K/W – 0.15m²K/W – the lower the number the better your heat output to the room.

Carpet tends to be the troublemaker, with some higher quality carpets having Tog value (similar to R Values) as high 5 togs which is 2 times higher than we recommend. We recommend carpets not to exceed 2.5 togs but the lower the tog, again better the output.

Try where possible to be installing tiles and approved vinyl floors as these are the best.

This is a short guide on floor coverings and how they can affect how you choose UFH but if you need specific advice then please speak to our technical team on 01245 227630.

Take a look at our Underfloor Heating products 

If you’ve any more questions about floor covering for UFH, our technical team are always here to help you out. Get in touch with us

Email Us


Call Us


Five-Point Winter Check For UFH Systems

Get your Underfloor Heating ready for winter

As winter approaches, do you cringe at the thought of turning the thermostat up? especially with the rise of gas and electric prices? You’re not alone, and the UFH system maybe needs a little more TLC to ensure 1. it is running correctly and 2. all mechanical and electrical components are working in a tip-top condition.

Now hopefully, you have your heat source regularly serviced by a registered plumber. If not, get it done, as this can affect not only the efficiency of your unit but also its safe running. But did you know it is just as important that your heat emitter is checked before the heating season starts? This will ensure that not only your system works, but the efficiency is optimum. Some items you can carry out yourself, but others will require a qualified plumber who can do the work as part of the boiler service.

5 Key Points to look out for:

  1. Depending on the thermostats you have installed, you might have wireless thermostats. If so, then it is worth checking the batteries. Batteries in these thermostats tend to last two years, but where the thermostat is near the end of the range of the box, it will have a much shorter lifespan and could not work when your system starts up. What’s more, if, on the border of range, a low battery symbol might not appear. We recommend changing your batteries every year to be sure.
  2. Make sure all actuators work. These are found on your manifold, typically on the bottom bar. When you turn your thermostats up, after around 5 minutes, they should be letting heat into your system. You are looking for an indicator on the actuator to show that they have raised. Please bear in mind that it differs with each manufacturer. But a sure sign they have opened is when they become warm during operation, and the pipe at the top should get warm.
  3. Your plumber/service engineer should check the operation of both the zone valve and pump on the UFH system (if fitted) one of the biggest issues we get with no heat in a system is a weak/faulty pump or a zone valve that does not open.
  4. Check for leaks. If your system is not holding pressure, the most common cause is manifold leaks. Check around the manifold for discolouration and build-up. This normally happens around the valve pin where the actuator sits. (Be careful the actuators are not water damaged). Your plumber should fix any leaks you have. All spares for Multipipe manifolds are available.
  5. If you are using a boiler, make sure your plumber checks the mixing valve on the manifold. This helps reduce the temperature going into your floor, making it safe. If this fails, this can cause damage to your floors or even cause health problems. So always make sure it is calibrated with the original manufacturer’s guidelines.

If you’ve any more questions about getting your UFH ready for winter, our technical team is always here to help you out.

DON’T FORGET TO FOLLOW US FOR THE LATEST NEWS AND BLOGS!

TWITTER WHATS INSTA FACEBOOK YOUTUBE

Evolution of UFH and Things to Be Aware of as an Installer


Underfloor Heating Installation. The Evolution of UFH and Things to Be Aware of as an Installer

We know that you want to be proud of every installation you do so this week’s blog looks at how best to install underfloor heating systems.
UFH (Underfloor Heating) is not a new commodity, but in recent years we have seen a surge in popularity driven by advances in technology. The first UFH systems were installed as far back as the 1970s, but these were very basic and too expensive to install in your average house. Fortunately, some major technical innovations were introduced around the 1990s, which meant UFH became more affordable and is now a very realistic option for many households.

Different Types of Underfloor Heating

There are different types of UFH systems available including:
  • Solid screed construction
  • Timber suspended
  • Overlay systems

The type of system used will usually be determined by the environment that the UFH will be installed in. Screed applications are becoming particularly popular in new property developments.
One thing to be aware of if you are installing UFH for a customer is that the industry is mostly unregulated, meaning that the quality of products could be sub-standard, without the same level of regulations as you see with other plumbing products. Therefore, it is really important to make sure that you are using a supplier that you can trust, so that your customer does not end up with a UFH system that causes future problems.
A lot of new UFH products have come onto the market with reduced prices but as with most things, you get what you pay for and good UFH systems won’t come cheap. That doesn’t mean that they are unaffordable, just that by buying the cheapest options, you could be causing big risks regarding the repercussions of a failing UFH system.

To help you to decide on which UFH system to use and to give you some considerations to bear in mind for installation, we have provided some key Do’s and Don’ts

Do – Know where your system is coming from, due to the unregulated industry there are many cheap pipes and systems available everywhere. You need to consider that if you save some money by buying a cheaper system, if the quality is poor, you could end up losing money when it comes to rectifying issues. A good quality pipe installation should last a minimum of 50 years due to the nature of burying pipe in the floor.
Don’t – Assume that UFH will automatically heat the property, it is always recommended that a heat loss calculation is done for a room to make sure that the UFH will perform sufficiently, taking into account the heat transfer rates and insulation in the property.
Don’t – Always believe what you see, always make sure that the output listed in the brochure matches what is required in the BSEN 1264 standard and that the floor surface temperature does not exceed 29°C in living areas or 33°C in bathrooms. Any system stating over 100w/m² output is probably in breach of this limit and could damage floor covering or even be hazardous to health.
Do – Use the knowledge of your UFH supplier/manufacturer. A good UFH supplier will have an in-house qualified design team to quote and design your system and offer advice on complicated systems. If you are using a system for the first time or require any product advice, you should definitely seek the advice of the product experts.

Multipipe Ltd has been trading in UFH systems for more than 20 years and has a dedicated technical team on hand to help you on your next project. For further in-depth help on UFH systems, we recommend a great all-in-one guide to purchase on the CIBSE website which explains everything you need to know about UFH design and installation.

Alternatively, just give our friendly technical design team a call and we’ll be happy to walk you through everything to do with our UFH systems.

Email Us


Call Us

Read more of our Tech Tuesday articles


View all

Follow us on social media to stay up to date with the latest industry trends, product offerings and more Tech Tuesday articles!


Facebook


Twitter


Linkedin


Instagram

Water quality in metal pipe systems

Water quality in metal pipe systems

Although copper pipework system failures are rare, we are finding more and more issues with copper corrosion in systems and now that pipe walls are getting thinner on copper, these systems are not lasting as long as they used to. One problem we see more through our helpline (which is more of a concern) is blue water.
This is a problem in copper pipe systems where, through water standing in a new pipe system for a long period of time, poor installation, electrolysis or excessive flux entering the system can cause a breakdown in the pipe wall.
This happens because instead of the pipe oxidising (like it should do), it keeps an unoxidised layer on the pipe wall. This then breaks down the copper minerals into the water, causing blue copper crystals to form making blue water. If it is a new system, then keep flushing the water through every day and over time the copper pipe will get lined with an oxidised layer. However, if the blue water persists it must be investigated.  Copper (although a natural antibacterial) in larger quantities can be hazardous to health.  If you have more than 2 mg/l of copper in your water, this can be dangerous to health. But if you see persistent blue water or your water has a metallic taste then consult your water supplier to get this tested.

An alternative solution to this problem is to use our MLC system as you do not get corrosion, plastics do not suffer from electrolysis and it does not require flux to carry out jointing which can damage your entire system if not used correctly.  

Ref: http://dwi.defra.gov.uk/consumers/advice-leaflets/copper.pdf
 
If you’ve any more questions about water quality in metal pipes, our technical team are always here to help you out. Get in touch with us

Email Us


Call Us


A beginner’s guide to Press-Fit Tools

A Beginner’s Guide to Press-fit Tools

Picking your way through the Minefield of Pressing Tools

Press systems are a newer way of carrying out fittings compared to more traditional solder and screwed methods. They can offer time and cost savings as well as many other benefits. Our beginner’s guide to press-fit tools provides a great overview to get you started.

Press-fitting systems use hydraulic press technology to provide a high-quality and easy to fit joint method. While this helps save a considerable amount of time on jobs, it can be difficult for first-timers to know where to start with more manufacturers coming on board. We have provided a guide to answering all the questions a press-fitting novice might have.

Multipipe press-fit tools

What are you installing?

When beginning to think about press-fit tools, the first question you need to ask yourself: What will I be installing?

With more systems coming onto the market, selecting the right pipe type is key.

For more traditional methods, you’ll have manufacturers of metal press systems. Still, plastic composite systems like Multipipe MLC is gaining popularity. These hybrid pipes are a great alternative to conventional methods, which might struggle on specific jobs where flexibility and hygiene are key to a quality installation. But still offer benefits of a metal system like lower expansion rates and 100% oxygen barrier.

Choosing the right type of pipe

All pipework systems in the UK are made to a BS EN standard, but depending on the manufacturer, these standards might differ.

The most common British standard for plastic pipes – BS EN 7291
BS EN 21003 – is the multilayer (MLC) standard
BS EN 1057 – is the Copper tube standards

These standards dictate the manufacturing process, pipe dimensions and wall thickness, all of which are hugely important in selecting the right pressing jaws. To press a joint onto these systems, you’ll need a set of compatible jaws as different pipe and fitting manufacturers use different jaw profiles.

Selecting the right jaw profiles

These profiles manufactured to the pipe dimensions and the set of ridges inside the profile help to press down on the sleeve to get a watertight joint. You cannot mix jaw profiles of different manufacturers. There are common types of profiles used by several manufacturers which would give you the best flexibility across different pipe types. But there are also a lot of individual company profiles so making sure you have the right jaws is key to a good join.

Here are some key examples;

U/TH– Profile
The Universal profile for MLC pipe systems for most MLC providers including Multipipe (we use U profile)

U Profile:

U profile press-fit jaws

TH Profile:

TH profile press-fit jaws

M/V profile – Used for most copper press systems on the market

V Profile:

M/V profile press-fit jaws

M Profile:

These are cross-sections of the most popular jaws and they show the subtle differences across the profiles when they are pressed.

A Pressing Matter – the Difference in Tool Strength

The last consideration in our guide to press-fit tools, is the pressing strength of the tool. Most press tool manufacturers have a small and a larger gun, but what exactly is the difference? The answer is that it’s mainly the strength of the hydraulic press.

Usually, the bigger the gun = the bigger the hydraulic press. Compact guns typically press up to 28/32mm pipes, with larger guns up to 108/110mm.

This means you need to consider what sizes of pipe you need to press. Some fitting manufacturers require specific press strengths for their systems, so be sure to factor this in. Our Multipipe MLC press system requires a 15KN press tool for sizes up to 32mm and a 32KN press tool for up to 110mm pressing.

Ready to shop? Click here

If you’ve any more questions about press-fit tools, our technical team are always here to help you out. Get in touch with us via WhatsApp (07858 138 228), email (info@multipipe.co.uk) or phone (01245 227630).

How to cut, calibrate and press multilayer pipes and fittings

How to cut, calibrate and press multilayer pipes and fittings

What is a multilayer composite pipe (MLCP)?

Multilayer pipes are a composite pipe, made up of inner and outer layers of temperature resistant PE-RT with metal with a central core of aluminium. This hybrid design makes for a perfect alternative to copper, saving you time and money on installation while delivering top quality results for both your domestic and commercial projects. These pipes are easy to form by hand, requiring no hot works, while also performing similarly to metal pipes and fittings with low heat expansion. As well as this, MLCP keeps its form after bending with no snapback all while staying free of corrosion and deposit build-up and offering an extremely lightweight copper pipe alternative.
In this tutorial, we will go over the press and cutting procedures of Multipipe’s multilayer pipes and fittings. Our pipes start from a diameter of 12mm up to 110mm but the procedure for cutting and bevelling is similar across the range.

  1. The first step – get a suitable pipe cutter for your pipe size.A single-bladed cutter is normally fine for sizes up to 40mm, whereas a wheel cutter will be required to cut larger diameters. Cut the pipe square – the key is a nice 90-degree cut.

Step 1 – cut.


  1. Once cut, we need to bevel the pipe.By putting a small chamfer onto the inner edge of the tube, it makes it easier to put on the fitting and stops damage to the o-rings. There are several types of bevelling tools on the market, starting with a simple three-size beveller. However, if you are doing many pipe sizes, it might worth looking at beveller that can be used with a  power tool. To make the bevel, insert the pipe onto the bevelling tool ensuring it is up to the cutting blades, rotate the tool a minimum of 2 times ensure you put only a small bit of pressure on the tool. When done, carefully slide the bevelling tool out of the pipe.

Step 2 – Bevel.


  1. Pick out the right fitting you wish to use ensuring to have the pipe size matching the marking on the fitting.When inserting the pipe into the fitting, you should be able to physically see the pipe in all three small viewing windows on the fitting.

Step 3 – Insert.


  1. Now press the fitting onto the pipe.Again, there is a large range of pressing tools that can be used. It is essential to ensure you have “U” profile jaws, as others could cause fitting issues. Load the press gun with the right size pressing jaw, which should be the same as your pipe and fitting.Open the jaws and insert it around the fitting, making sure it is placed between the fitting ridges. Pull the trigger, and the tool will make the press. Unlike other press systems, it is a single press process for all dimensions. When done, remove the tool from the fitting, and you will see the press marks on it.

Step 4 – Press.

That is how simple it is to work with Multipipe’s products. Multipipe MLCP uses high-grade materials, innovative research, and a patented production process to guarantee you the highest quality product and ensures the long-term safety of your projects. Make sure to watch our tutorial of this online, or browse through our other how-to videos to learn a new skill!